Showing posts with label spreadsheet. Show all posts

Wednesday, 5 September 2018

Krokbragd comparison (Krokbragd #3)

Latest update - check out Krokbragd #4 for images of the warping pattern with actual yarn.

It has been a head-scratching week here at KiniB. Trying to make sense of the various Krokbragd instructions across various books and websites. I think I've got my head around it but if anyone spots a mistake hopefully they'll let me know.

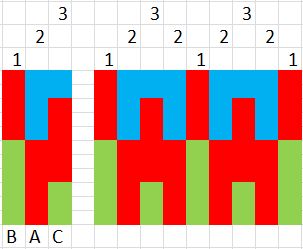
I have based my research on the warping pattern from Yarn in my Pocket. Back slot to front slot is shaft (weft thread colour) #1. Back slot to front hole is colour #2 and back hole to front slot is colour #3. There are twice as many #2 warp threads to create the repeat in pattern 1-2-3-2, 1-2-3-2...

Remember - in Krokbragd the warp is completely covered by the weft so it can be of any colour and would, I expect, normally be one colour. For clarity, so you can see which thread goes where, three colours are used in the diagram.

I chose the 2&3...1&3...1&2...1&3 (1... 2... 3... 2...) lift pattern as a baseline, because that seemed to produce the most consistent results when testing patterns. Putting that together with the warping shown gave me the lifting and shed sequence shown below. Note that while that looks like four separate movements there are only three movements involved. The 1&3 repeats are created in one pass of the weft.

Now lets add some weft colours. We'll use blue, red and green in that order.

Lifting both heddles (2 & 3) and passing the weft creates a pattern pixel of weft colour A (blue).

Lowering the front heddle (1 & 3) and passing the weft creates a pattern pixel of weft colour B (red).

Lowering the back heddle (1 & 2) and passing the weft creates a pattern pixel of weft colour C (green).

The next step was to map the instructions from other Krokbragd resources onto this pattern. The results are as shown below. The different order of lifts means that if we use the weft colours A (blue), B (red) and C (green) in the same order for each set of instructions, they will appear in different parts of the four pixel/warp wide pattern.

For example. Yarn in my Pocket starts the sequence with shafts 1 and 2 lifted, opening shed 3. So when we pass the blue weft it will appear in shaft position three of the pattern. Next in the sequence shed 1 is opened so the red weft will appear in the first position. Finally both heddles are raised to open shed 2 which gives two green threads. The resulting four column thread pattern is shown below each table.

If we apply this logic to a simple pattern it is easier to see the effect of these different mappings. In the top row we have, to the left, the original pattern using the sequence described by Ask the Bellwether. To the right is the same pattern using the shed sequence from Yarn in my Pocket.

In the second row are the patterns based on the sequences in "The Wheel" and in the booklet "Krokbragd and Boundweave: Three, Four and Five Shafts" (also known as "Blended Draft for Krokbragd" by David Xenakis).

It should be noted that in David's book he uses a different warping pattern, as shown below. Notice how the repeated thread corresponds to the Slot - Slot warps.

I don't know if anyone else will find this piece of research useful, but it has really helped me to think through how Krokbragd patterns are constructed and how one small change in lifting order can completely change the way the pattern appears when woven.

If you would like a copy of the spreadsheet, you can download it here

Do let me know if you've found it helpful.

Sunday, 2 September 2018

Krokbragd confusion (Krokbragd #2)

Latest update - check out Krokbragd #4 for images of the warping pattern with actual yarn.

As the tag line says, the aim of the blog is to celebrate the intersection of art and science. In light of that I decided to apply my technical knowledge to Krokbragd weaving. OK, I'll admit, I got the nudge from a question on the Facebook "Weaving Krokbragd" group. The question was asked "How do you design a pattern?" That got me thinking. I've been able to follow instructions, such as those in Jane Patrick's "Weaver's Ideas" book, but I still didn't really understand what I was doing. So I did what any good scientist does and read the literature.

The group has a treasure trove of information. I scanned the files looking for more information and to my delight a new file seemed to hold the Rosetta Stone of Krokbragd on a rigid heddle. The description was clear and concise. I felt like I was beginning to understand how Krokbragd patterns could be created but there was a problem.

I had been using a 1&2..2&3..3&1.. lift pattern. My Krokbragd Rosetta Stone gave the lift pattern as 2&3..1&3..1&2. Oh! How can that be? My patterns looked like patterns I'd seen, so I'd assumed I was doing things right. I didn't really know how they worked but I could create arrow heads and flame points and was jolly pleased with myself. I rechecked my lift pattern and to steal from the legendary Eric Morecambe - It seemed I'd got all the right moves, but not necessarily in the right order.

I read on.

The file explained by lifting 2&3 (raising both heddles) the first pick (strand of weft thread) would cover warp thread #1 (shaft 1 warp in shaft loom terms). Lifting 1&2 (lowering the front heddle) would cover warp thread #2 and lifting 1&3 (lowering the back heddle) for the third pick would cover warp thread #3. I compared that to the warping guide from Yarn in my Pocket blog 93.

A penny started to drop. When the weft goes over the top of the warp it creates a "pixel" of weft coloured pattern. Each pattern group is made up of columns of yarn pixels. Each column is four pixels wide because the pattern repeat is 1-2-3-2---1-2-3-2---1-2-3-2... Hopefully you can see from the diagram that there are twice as many green threads because that part of the pattern appears twice.

Well duh! I hear you murmuring. I know, I embarrass myself, but I'd got so hung up on shafts and heddles and three wefts to one pattern row that I'd forgotten the basics of weaving. Let's have a picture to make things clearer. Hopefully you can see which part of which heddle is controlling the shed.

Note - in Krokbragd the warp is completely covered by the weft so it can be of any colour and would, I expect, normally be one colour. For clarity, so you can see which thread goes where, three colours are used in the diagram.

I opened a spreadsheet programme and began to transfer the pattern for a Krokbragd sheep. Then I automated it, so that as a colour code is entered, the pattern repeat appears.

I began adding more drafts to the spreadsheet and as I did so I noticed that some of the patterns didn't seem to work. Eh? Surely I was now the Krokbragd Queen. Did I not understand the principles of creating a Krokbragd pattern? I had a spreadsheet and everything. So what was going wrong? The guitar pattern seemed particularly loathe to bend to the will of my spreadsheet.

The pattern draft indicated wefts of White Red and Green should create a red guitar neck with green tuning pegs. Instead of two sets of pegs, the pattern was generating two red necks. The design is in "Weaver's Ideas" so I took a look at that.

The weaving draft seemed to start on #2 rather than #1. So I moved the colours across one shaft. That was a bit better: one guitar neck, but with floating tuning pegs. Still not right. So I did what any good engineer does - I bodged it. I rearranged the colours until I got the image I was looking for. Then I tried weaving it. That was interesting.

I discovered that using my 1&2..2&3..3&1.. lift pattern created the floating tuning pegs pattern to the above right. I swapped to 2&3..1&3..1&2.. and Eureka! Guitars.

I was of course thrilled to be able to try out designs as digital pixels before turning them into cloth pixels, but I was puzzled by the variations I'd seen. I looked at my Krokbragd resources and noticed there were three different variations of the lifting order. There were also two different ways to warp two heddles to create the three shaft pattern.

Crikey!

I needed a way to try and compare each method, without having to rewarp my loom. So it was back to the spreadsheets. Next time I'll share my findings.