Sunday 23 September 2018

Where art meets technology: a laptop bag.

Trying to think of a tagline for this blog, I really wanted to say "Where art meets, science, technology, maths and engineering." In short "where art meets STEM," but not everyone knows what STEM stands for, so I went with science as it seemed to best capture what I was trying to say. After all, maths is the language of science, the shorthand by which we can describe the world, and of course, technology and engineering are the application of science.

Today's make was inspired by technology (and a confirmed order). We like those!

The brief was for a laptop bag that could be worn across the body, like a messenger bag, to fit a fifteen inch laptop, with a pocket for the power supply. Colours and design were up to me.

In the craft cave there was some lovely black denim, nice and hardwearing for a bag that might see a lot of travel. There was also some printed cotton. The pattern is somewhere between a Monet painting and the deep space photos from the Hubble telescope. But what to use for padding? Quilt batting didn't seem to offer enough protection, even with several layers stacked up. I looked around. By the door of the craft cave was the bag of shame. A bag of oddments that had been waiting to go to the charity shop for at least six months. Eureka!

During the Christmas frenzy of 2016, it became apparent that the somewhat gauzy, but very sparkly tablecloth, made specially for the festive feast, wasn't going to offer the table much protection from hot plates and bowls. Cue a trip to the fabric store in search of heatproof matting to put underneath the cloth. In my haste, I didn't do anything useful like measure the table and being so close to Christmas the saleswoman was in up-selling mode. I left with enough heatproofing for two tables.

I must have been very late to the (heat mat) party, because even on the local Freecycle site there were no takers and eventually, during the big spring clean of 2018, the extra mat was put aside with a few other bits and bobs, destined for one of the many charity shops in town.

The mat has a polyester felt backing, with a PVC embossed top. It's around 2.5mm thick and is dense enough to afford a reasonable amount of protection, but easy to cut with a pair of scissors. You can buy a similar product with a leather look top, but I was drawn to the octagon tiled effect of this brand. A similar product can be found here.

The bag is based on a fairly standard tote design. A rectangle of denim for the front, base and back was quilted with a layer of Decovil for structure and heatmat for protection. The lining fabric was quilted with just heatmat. A large zip pocket at the back provides a safe place for a phone, purse, keys, or a power supply cable.

I usually like to use zip closures but the owner of the bag will be cycling around in all weathers, so it seemed a good idea to have a fold over flap for extra weather proofing. Side release clasps seemed to provide the best combination of security and ease of use, so two 25mm clasps were added to the flap, using some of the lining fabric for a dash of colour.

A divider was added by quilting a piece of heatmat between some lining fabric. The divider was sewn in place between the front and back lining fabric. Then the whole lining assembly was dropped into the bag and topstitched together around the top edge.

An inkle band was backed with a strip of the denim to form the strap. A cushion, padded with more of the heat mat, was added for extra comfort.

Hopefully the owner will love the bag as much as I do. I really like the vertical stripes created by the quilting. I think they make it look very smart. Just right for the young woman about town. The Monet/Hubble fabric gives it a pop of colour and a playful edge. All in all I'm pleased with the design.

It was hard to let this one go, but I think I can improve on it. Having the zip pocket at the back is a nice safety feature if you use it to hold your purse and phone, but it might not be very comfortable with the charger stored in there. So maybe moving the charger pocket to the front, under the flap, or inside the bag would make for a more comfortable design.

What do you think?

Monday 17 September 2018

Doctor Who Keyring

What does any fan of the good Doctor need to complete their accessories?

Why, a Doctor Who wristlet.

The stripes are inspired by the costume of the newest Doctor Who - Jodie Whittaker.

The band is a plain (tabby) weave and made of 100% cotton, so nice and soft on the wrist, but also hard wearing. It would make a great keyring, or a wristlet strap for a bag, camera or phone. Just the thing for any fan of the good Doctor.

Please get in touch if you know anyone who would love to show their support for the good lady Doctor

Wednesday 12 September 2018

Geode inspired coasters

Do you ever look at something and think, "Oooh! That would be fab in fabric?" Well today I am feeling inspired by geology; by the colours and folds that can be seen in the rocks of our landscape. The lines and textures would surely make a great image, but unfortunately, I don't know (yet) how to translate that inspiration into something fabric. Maybe embroidery, maybe a woven picture. Perhaps appliqué. Maybe a print on demand fabric?. For now that project is still in the pondering phase.

While I think about how to turn rock folds into fabric the urge to do something "rocky" isn't going away. So I had a rummage in the scraps' bag and found some felt. Perfect! For a while now, it's been obvious there should be a coaster on the bedside table. The circle of slightly worn away paint either needs touching up, or covering up and we all know which would be more fun to do. With my mind on rocks, the obvious design element (well obvious to me) was a geode. Those pretty little caves of crystal wonder.

The science bit

A geode is a hollow rock that is roughly spherical, maybe egg shaped, that formed in sedimentary or volcanic rock. In volcanic rocks the shape is formed by a gas bubble. In sedimentary rocks it might be formed by a tree root, or an animal burrow that over time rots away, leaving a void in the rock.

Water carrying dissolved minerals seeps into the rock's void and some of the mineral is deposited. Over time crystals grow inside the little rock cave. They might be almost clear quartz or calcite. Often the minerals interact with the quartz or calcite and produce vivid colours: blues, purples, yellows. The beautiful purples of amethyst crystals occur when quartz interacts with iron.

This page has more information about geode formation and there are also some cool videos on YouTube

Sometimes the entire geode is filled with crystals. When that happens slices through the geode show rings of crystal formation. It was an agate slice that inspired today's make.

Back to the crafting

My first attempt at a geode coaster was OK. Using a variable length zigzag stitch and a few different coloured threads to create circles of crystals, it didn't take long to create a rather psychedelic looking geode. Pelmet stiffener was sandwiched between two felt layers to stiffen the coaster and it was finished off a circle of clear vinyl stitched in place over the top.

It was OK, but I was sure there was a better solution than a loose piece of vinyl. I briefly considered gluing the vinyl in place, but then decided that someone else must have had the same problem and switched on the computer.

Eureka!

Fusible vinyl. Why am I only just learning about this?

For my second attempt I used a grey background, to represent the clear crystals of the geode. Black felt for the back and black edge stitching gave a more rock-like colour scheme for the "outside" of the geode. Then it was the moment of truth. Armed with my new favourite craft supply and a medium hot iron I held my breath, hoping I wasn't going to end up with glue and melted vinyl stuck to the iron.

I am so pleased with this second attempt. It has the stiffness of a "proper" coaster and the waterproof coating sits snuggly over the embroidery. I think I will be making more of these for the winter fairs. If you were going to buy a set of four would you want all one colour scheme or a variety of colours to choose from? Add a comment and tell me what you'd prefer.

Friday 7 September 2018

Inkle Sheep

After all that hard thinking about shaft mapping and the like for my Krokbragd posts, I was really feeling the need for something a bit easier on the grey matter. And here it is:- card woven sheep.

Idly searching for who knows what I came across this blog post at Hilltop Cloud.

I knew I just had to weave some of those cute little creatures. So I did.

They are so adorable with their little black hooves and chubby little bodies. Weaving them was a joy as it is a simple four forwards, four backwards repeating pattern. The only twisting to worry about was at the edges for the border.

Setting up the loom was less of a joy.

Much as I enjoy tablet weaving, setting up the warp is a real pain in the backside. I've not yet managed to find a warping technique that didn't result in a couple of big knots and a length of whatever was to hand tying them together. As you can see, not pretty and hard to tension. Arghhhhhh! Oh and that's the improved version, after I added the carabiners.

Then, I received a new book. "Tablets at Work" by Claudia Wollny. It is awesome! Seven hundred or so pages of detailed instructions. A proper text book for card weavers. Claudia describes in detail a warping technique that I'd seen before and dismissed as looking a bit complicated. She makes it sound much easier. So in the near future, I'm going to give it a go and hopefully it will be "Bye, bye, big ugly knots holding my band together."

If you're interested in weaving some sheep, here is the card set up. I don't think I'm infringing anyone's copyright as I've seen the pattern all over the place since I saw it on Hilltop Cloud. But if you copy it, why not give Katie and Hilltop Cloud the credit.

Happy weaving.

Wednesday 5 September 2018

Krokbragd comparison (Krokbragd #3)

Latest update - check out Krokbragd #4 for images of the warping pattern with actual yarn.

It has been a head-scratching week here at KiniB. Trying to make sense of the various Krokbragd instructions across various books and websites. I think I've got my head around it but if anyone spots a mistake hopefully they'll let me know.

I have based my research on the warping pattern from Yarn in my Pocket. Back slot to front slot is shaft (weft thread colour) #1. Back slot to front hole is colour #2 and back hole to front slot is colour #3. There are twice as many #2 warp threads to create the repeat in pattern 1-2-3-2, 1-2-3-2...

Remember - in Krokbragd the warp is completely covered by the weft so it can be of any colour and would, I expect, normally be one colour. For clarity, so you can see which thread goes where, three colours are used in the diagram.

I chose the 2&3...1&3...1&2...1&3 (1... 2... 3... 2...) lift pattern as a baseline, because that seemed to produce the most consistent results when testing patterns. Putting that together with the warping shown gave me the lifting and shed sequence shown below. Note that while that looks like four separate movements there are only three movements involved. The 1&3 repeats are created in one pass of the weft.

Now lets add some weft colours. We'll use blue, red and green in that order.

Lifting both heddles (2 & 3) and passing the weft creates a pattern pixel of weft colour A (blue).

Lowering the front heddle (1 & 3) and passing the weft creates a pattern pixel of weft colour B (red).

Lowering the back heddle (1 & 2) and passing the weft creates a pattern pixel of weft colour C (green).

The next step was to map the instructions from other Krokbragd resources onto this pattern. The results are as shown below. The different order of lifts means that if we use the weft colours A (blue), B (red) and C (green) in the same order for each set of instructions, they will appear in different parts of the four pixel/warp wide pattern.

For example. Yarn in my Pocket starts the sequence with shafts 1 and 2 lifted, opening shed 3. So when we pass the blue weft it will appear in shaft position three of the pattern. Next in the sequence shed 1 is opened so the red weft will appear in the first position. Finally both heddles are raised to open shed 2 which gives two green threads. The resulting four column thread pattern is shown below each table.

If we apply this logic to a simple pattern it is easier to see the effect of these different mappings. In the top row we have, to the left, the original pattern using the sequence described by Ask the Bellwether. To the right is the same pattern using the shed sequence from Yarn in my Pocket.

In the second row are the patterns based on the sequences in "The Wheel" and in the booklet "Krokbragd and Boundweave: Three, Four and Five Shafts" (also known as "Blended Draft for Krokbragd" by David Xenakis).

It should be noted that in David's book he uses a different warping pattern, as shown below. Notice how the repeated thread corresponds to the Slot - Slot warps.

I don't know if anyone else will find this piece of research useful, but it has really helped me to think through how Krokbragd patterns are constructed and how one small change in lifting order can completely change the way the pattern appears when woven.

If you would like a copy of the spreadsheet, you can download it here

Do let me know if you've found it helpful.

Sunday 2 September 2018

Krokbragd confusion (Krokbragd #2)

Latest update - check out Krokbragd #4 for images of the warping pattern with actual yarn.

As the tag line says, the aim of the blog is to celebrate the intersection of art and science. In light of that I decided to apply my technical knowledge to Krokbragd weaving. OK, I'll admit, I got the nudge from a question on the Facebook "Weaving Krokbragd" group. The question was asked "How do you design a pattern?" That got me thinking. I've been able to follow instructions, such as those in Jane Patrick's "Weaver's Ideas" book, but I still didn't really understand what I was doing. So I did what any good scientist does and read the literature.

The group has a treasure trove of information. I scanned the files looking for more information and to my delight a new file seemed to hold the Rosetta Stone of Krokbragd on a rigid heddle. The description was clear and concise. I felt like I was beginning to understand how Krokbragd patterns could be created but there was a problem.

I had been using a 1&2..2&3..3&1.. lift pattern. My Krokbragd Rosetta Stone gave the lift pattern as 2&3..1&3..1&2. Oh! How can that be? My patterns looked like patterns I'd seen, so I'd assumed I was doing things right. I didn't really know how they worked but I could create arrow heads and flame points and was jolly pleased with myself. I rechecked my lift pattern and to steal from the legendary Eric Morecambe - It seemed I'd got all the right moves, but not necessarily in the right order.

I read on.

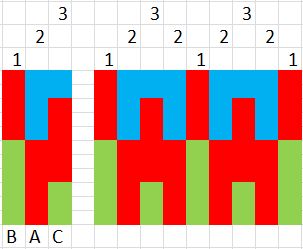
The file explained by lifting 2&3 (raising both heddles) the first pick (strand of weft thread) would cover warp thread #1 (shaft 1 warp in shaft loom terms). Lifting 1&2 (lowering the front heddle) would cover warp thread #2 and lifting 1&3 (lowering the back heddle) for the third pick would cover warp thread #3. I compared that to the warping guide from Yarn in my Pocket blog 93.

A penny started to drop. When the weft goes over the top of the warp it creates a "pixel" of weft coloured pattern. Each pattern group is made up of columns of yarn pixels. Each column is four pixels wide because the pattern repeat is 1-2-3-2---1-2-3-2---1-2-3-2... Hopefully you can see from the diagram that there are twice as many green threads because that part of the pattern appears twice.

Well duh! I hear you murmuring. I know, I embarrass myself, but I'd got so hung up on shafts and heddles and three wefts to one pattern row that I'd forgotten the basics of weaving. Let's have a picture to make things clearer. Hopefully you can see which part of which heddle is controlling the shed.

Note - in Krokbragd the warp is completely covered by the weft so it can be of any colour and would, I expect, normally be one colour. For clarity, so you can see which thread goes where, three colours are used in the diagram.

I opened a spreadsheet programme and began to transfer the pattern for a Krokbragd sheep. Then I automated it, so that as a colour code is entered, the pattern repeat appears.

I began adding more drafts to the spreadsheet and as I did so I noticed that some of the patterns didn't seem to work. Eh? Surely I was now the Krokbragd Queen. Did I not understand the principles of creating a Krokbragd pattern? I had a spreadsheet and everything. So what was going wrong? The guitar pattern seemed particularly loathe to bend to the will of my spreadsheet.

The pattern draft indicated wefts of White Red and Green should create a red guitar neck with green tuning pegs. Instead of two sets of pegs, the pattern was generating two red necks. The design is in "Weaver's Ideas" so I took a look at that.

The weaving draft seemed to start on #2 rather than #1. So I moved the colours across one shaft. That was a bit better: one guitar neck, but with floating tuning pegs. Still not right. So I did what any good engineer does - I bodged it. I rearranged the colours until I got the image I was looking for. Then I tried weaving it. That was interesting.

I discovered that using my 1&2..2&3..3&1.. lift pattern created the floating tuning pegs pattern to the above right. I swapped to 2&3..1&3..1&2.. and Eureka! Guitars.

I was of course thrilled to be able to try out designs as digital pixels before turning them into cloth pixels, but I was puzzled by the variations I'd seen. I looked at my Krokbragd resources and noticed there were three different variations of the lifting order. There were also two different ways to warp two heddles to create the three shaft pattern.

Crikey!

I needed a way to try and compare each method, without having to rewarp my loom. So it was back to the spreadsheets. Next time I'll share my findings.