Thursday 27 December 2018

Let it snow, let it snow, let it snow

When I was a kid snow was a seasonal source of fascination. Described as a blanket, yet cold to the touch. From a distance, uniform, white, featureless. Up close, unique crystals of ice stuck together in delicate hexagonal patterns. Soft to the touch as flakes fell onto an outstretched hand, yet hard and painful when made into a ball and thrown during the many snowball fights of winters past. It was strong enough to build snow statues yet melted away in the sun. Snow was a magical substance that captured my imagination. The idea no two snowflakes could be the same was one of the many wonders that encouraged me to pursue the sciences in a bid to understand the magic around me.

As an adult snow maintains its allure, perhaps because it is rarely seen in the area I now call home, however, the idea of unique snowflakes is no longer a mystery. The development of chaos theory during the second half of the 20th century provided a convenient explanation of how the shape of a snowflake would be dictated by its path through the air and the other crystals it encountered on the way. Whilst the ice crystals that join up to make a snowflake have a limited number of pattens, the number of ways they can combine is astronomical.

An entire blog could be devoted to the wonder that is the physics and chemistry behind the creation of snowflakes, but it's Christmas, so let's just look at some pretty pictures.

Above you can see a macrame snowflake that I've been meaning to make for the last three years. Its time finally came when I'd crocheted my small stash of lurex yarn into a variety of snowflakes using patterns from Caitlin Sainio's wonderful book and had to turn to string as a material. Unlike the crochet snowflakes, the macrame was a free form pattern that I made up on the fly using basic square knots. Next year might see me developing the idea using something a bit more sparkly than kitchen string, but for now here are a couple of the crocheted pieces.

The village art group arranged a lino printing workshop, which was so much more fun than the lino cutting of my youth. Modern "lino" is much softer than the rhino skin material of yesteryear, which made it much easier to produce the snowflake linocut (on the left). On the right is a print taken from the lino.

The final examples are a bit of freeform embroidery, which became a festive coaster, and an image from a snowflake generator that turned up during an idle internet search. You can try it for yourself here.

It seems that while natural snowflakes are unique, those created by me have a definite pattern to them, but they were all fun to make, as were the snowflake biscuits, which didn't last long enough to be photographed.

What were your festive makes? I'd love to see them.

Sunday 25 November 2018

Yule Log Cabin

A question recently came up on a weaving forum. How do you warp for log cabin patterns? I stared at the screen for a moment and then thought "Same as I always do."

But then I cast my mind back to my first attempt at a log cabin pattern. It seemed to be so complicated and needing way more effort than I thought it should. I could NOT get my head around how to warp it. I looked at books. I looked at videos. Many of the methods involved tying individual warps or creating a direct warp loop then cutting it and tying it to the back beam. Not a simple continuous warp. That was the goal.

In the end, by drawing pictures of the warp loops in the heddle and how they'd split into the pattern, a continuous warp was achieved.

My first attempt was not great. There was not enough contrast between the yarn colours, but it was clear from looking at more successful colour pairings the optical illusion of a log cabin pattern was a goal worth pursuing. But how to get over the tedium of warping it? There had to be a way to simplify the warping: one that avoided lots of cutting and tying, or having to colour in pictures on squared paper.

I applied the Feynman algorithm and thought hard about the problem. How to tie on a log cabin without too much effort? Aided by the magic of Photoshop layers, I mocked up the warp and here is the result. My (slightly) lazy version of a log cabin warp.

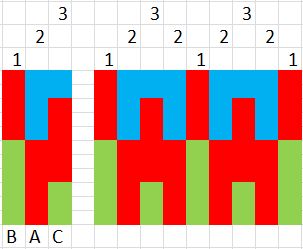
A basic log cabin contains two pattern blocks. Both blocks start on one colour and end on another. In each block there are equal numbers of warp threads for each colour.

As you change from one block to the next there are two warps of the same colour. So moving from block 1 to block 2, there are two yellow warps together. Moving from block 2 back to block 1, there are two blue warps together. So how can that pattern be created using a direct warp and without lots and lots of knot tying?

It helps to think of the two blocks as a block of six and a block of four, instead of two blocks of five. So for block one warp three loops of blue in the slots as normal, but skipping every other slot. Next warp three loops of yellow in the holes to the right of the "blue" slots. That's block one complete. Notice how there are an empty slot and hole between each pair of colours and that there are six loops warped up.

For block two, skip a slot and a hole as before. In the next slot, start with yellow, skip a slot and warp the next one. Then add the blue into the holes next to the yellow. This time you only need four warp loops. As before skip a slot and a hole and then repeat block one. Repeat the two blocks across the required width.

Once the warp is complete cut the loop at the warping peg and wind on to the back beam as normal. Then pull the warp threads into the correct holes as per the pattern.

Maybe I should try this out for blocks of different sizes and see if it works for those too. What do you think? Would that be useful? Leave a comment and let me know.

Sunday 11 November 2018

Inspect the Morse

I've always been interested in codes and ciphers. The idea that a message could be encrypted so that only the intended recipient could read it was fascinating to my younger self and well, I still find them fascinating.

A cipher is a series of steps used to encrypt data. Ciphers work at the level of individual letters or numbers, or in electronic terms at the level of a bit, or byte. In general for each one character in the original text there will be one character in the encryption. A key is required as part of the cipher

Codes, on the other hand, may use more or less characters and work at the level of meaning. Whole words or phrases are converted. A codebook might link a random set of letters and or numbers to particular messages. For example HTSU89 might represent "I'm thirsty, bring tea please." OK, not a very likely code, but who wants to get picked up on GCHQ's radar.

Morse Code

In 1836 Samuel Morse, Joseph Henry and Alfred Vail developed a system to send electric pulses along a wire. By 1844 this had developed into a system of dots and dashes (short and long pulses) which were grouped together to represent the English alphabet and the numbers 0 to 9. The dot duration is the basic unit of time measurement in Morse code transmission. The duration of a dash is three times the duration of a dot. Each dot or dash within a character is followed by period of signal absence, called a space, equal to the dot duration. The letters of a word are separated by a space of duration equal to three dots, and the words are separated by a space equal to seven dots.

From telegraph to radio communications, morse code was invaluable during the world wars and was used as an international maritime standard up until 1999. Today it is mostly used by hobbyists.

And crafters.

The Morse Scarf

Using the many online Morse translators it was easy to translate a word into a series of dots and dashes. I chose the word "love." I really liked the idea of making a scarf that would wrap the owner in a warm swirl of love.

Love in Morse is represented by .-.. --- ...- . and using standard Morse spacings would not fit easily on the heddle needed for the chosen yarn. So the code was represented in units of two warp spaces. That gave just the right number of code warps plus a small border at each side of the scarf.

The scarf itself was woven on a rigid heddle loom with a 15 dent heddle. The yarn is the gorgeous laceweight silk and alpaca from "Drops." Each warp is made up of two strands of the yarn to make the letters really stand out.

The resulting scarf is soft, warm and drapes beautifully. It has been one of my most popular makes and on Christmas Day there will be a number of lucky ladies (why no men?) who will be unwrapping a little bit of communications history in textile form.

What word would you choose for a Morse scarf?

Saturday 27 October 2018

Tied in knots

Geometry is the maths that makes the world pretty. OK, that's not necessarily true, really it's a combo of physics and chemistry producing shapes and colours, plus I suppose biology - our ability to see and interpret the beauty. Geometry is the study of the shape, size, relative position of figures, and the properties of space. So whether those shapes are the hexagons of a honey comb; the pentagram core of an apple,the circles of colour in your eyes... Well you get the picture. All geometry.

Today's make was inspired by fiddling about with a strip of paper left over from cutting out a pattern: folding it, twisting it and eventually tying a knot while I mused about the pattern in question. The knot made by a tied strip of paper is pentagonal (five sided) in shape.

If you tie a thumb knot as shown and flatten it down, then repeat the process four more times you can close the loop to create a pentagon out of a ring of pentagonal knots.

It struck me that such a pentagon, made from a folded inkle band would make a rather stylish decoration, for Christmas, or just for fun. So I looked through my inkle bands and chose the most festively coloured. Last year I created an inkle band choker from some festivally coloured cotton and a handful of beads. The left overs from that weave were perfect to turn into a prototype ornament. I quickly set about tying the knots. There was a bit of adjusting required to get the knots to lie snugly next to each other, but with a tug here and a push there the pentagon began to take shape.

The ornament was very pretty on its own, but adding a bell gives it a little Jingle Bells festive fun. What do you think? With a bell or without? Tell me which version you'd prefer and if you'd like to see some other examples pop over to my website, here.

Monday 15 October 2018

The Jodie Bag

Anyone interested in British TV sci-fi probably noted that the long running show "Doctor Who" has broken with tradition and cast a woman in the role of the Doctor. There was an outcry from some people who apparently couldn't believe that an alien, with two hearts, who travels through time and space, who cheats death by regenerating into a totally different looking body, couldn't possibly regenerate into a woman shaped body. Seriously? That's what they were struggling with?

Hopefully, they gave the show a chance and having now seen two episodes they'll be warming to the idea if not fully embracing it. Me, I think Jodie Whittaker is luminous as the good Doctor. So much so that I felt inspired to create another tech-bag, with a nod towards her costume. If you can't wait to see it, scroll to the bottom of the page.

Jodie and Tardis image copyright BBC.

The stripe on her tee shirt was begging to be included in the design, which meant another session with the inkle loom, having made keyrings out of the previous band. Happily, I like to inkle, so it wasn't a hardship to spend a couple of days weaving. I did have a minor panic half way through: "Why would anyone want a hand woven band if you can buy them online?" A quick trawl of the web reassured me. Commercial bands don't have the same stripe, being a traditional rainbow pattern, not the Jodie stripe. Phew!

As usual I went with the Richard Feynman problem solving process and thought hard about the bag then sketched out the design. Based on a flat bottom tote the bag is made from rectangles of cloth, interfacing, batting and lining fabric. The dimensions were chosen to create a bag big enough to fit in a tablet computer or Kindle device and have room for an inner zip pocket for keys, phone and purse or wallet.

As a nod to Jodie's braces the side release clasps were attached using long strips of fabric. I generally like zip fastners for a handbag, but somehow, side release clasps just seem to work better for tech-bags. Is that weird?

The Tardis is as much a part of the show as the Doctor. Could its battered frame be excluded from the design?

Short answer - No.

It would have been easy to go overboard with embroidery and appliqué trying to recreate the windows and text of the police box in fabric, but this was meant to be a tribute to Jodie, not the Tardis. In what will be a shock to those who know me well, I went subtle. Instead of the usual lines of quilting to attach the batting to the outer bag the quilting takes its inspiration from the Tardis exterior panelling. It is a blink and you'd miss it detail, but one that pleases me. You can see the lines here on the interior of the flap. Maybe there'll be a Tardis tote further down the line...

The bag lining reminds me of the Hubble Telescope deep space images, which seemed a good match for the Doctor. It is also kind of an in joke. The Tardis is known to be "bigger on the inside" and how much bigger could you get than the universe. And just to add a little extra "space" there is a zipped pocket. I like this picture. It shows the colours in the fabric much better.

To complete the bag, it of course needs a strap. It was tempting to use more of the rainbow band, but that might have been a bit "too much." Instead it will probably have a plain blue band backed with the same fabric as the bag. I was so excited to complete the bag that I couldn't wait to blog about it, so in the final image you have to ignore the strap, that's there just for hanging purposes.

I think this would make the perfect accessory for the Doctor Who fan in your life. It is designed to hold a tablet computer, but work equally well as a handbag or small messenger bag. What do you think? Please leave a comment and let me know.

Sunday 23 September 2018

Where art meets technology: a laptop bag.

Trying to think of a tagline for this blog, I really wanted to say "Where art meets, science, technology, maths and engineering." In short "where art meets STEM," but not everyone knows what STEM stands for, so I went with science as it seemed to best capture what I was trying to say. After all, maths is the language of science, the shorthand by which we can describe the world, and of course, technology and engineering are the application of science.

Today's make was inspired by technology (and a confirmed order). We like those!

The brief was for a laptop bag that could be worn across the body, like a messenger bag, to fit a fifteen inch laptop, with a pocket for the power supply. Colours and design were up to me.

In the craft cave there was some lovely black denim, nice and hardwearing for a bag that might see a lot of travel. There was also some printed cotton. The pattern is somewhere between a Monet painting and the deep space photos from the Hubble telescope. But what to use for padding? Quilt batting didn't seem to offer enough protection, even with several layers stacked up. I looked around. By the door of the craft cave was the bag of shame. A bag of oddments that had been waiting to go to the charity shop for at least six months. Eureka!

During the Christmas frenzy of 2016, it became apparent that the somewhat gauzy, but very sparkly tablecloth, made specially for the festive feast, wasn't going to offer the table much protection from hot plates and bowls. Cue a trip to the fabric store in search of heatproof matting to put underneath the cloth. In my haste, I didn't do anything useful like measure the table and being so close to Christmas the saleswoman was in up-selling mode. I left with enough heatproofing for two tables.

I must have been very late to the (heat mat) party, because even on the local Freecycle site there were no takers and eventually, during the big spring clean of 2018, the extra mat was put aside with a few other bits and bobs, destined for one of the many charity shops in town.

The mat has a polyester felt backing, with a PVC embossed top. It's around 2.5mm thick and is dense enough to afford a reasonable amount of protection, but easy to cut with a pair of scissors. You can buy a similar product with a leather look top, but I was drawn to the octagon tiled effect of this brand. A similar product can be found here.

The bag is based on a fairly standard tote design. A rectangle of denim for the front, base and back was quilted with a layer of Decovil for structure and heatmat for protection. The lining fabric was quilted with just heatmat. A large zip pocket at the back provides a safe place for a phone, purse, keys, or a power supply cable.

I usually like to use zip closures but the owner of the bag will be cycling around in all weathers, so it seemed a good idea to have a fold over flap for extra weather proofing. Side release clasps seemed to provide the best combination of security and ease of use, so two 25mm clasps were added to the flap, using some of the lining fabric for a dash of colour.

A divider was added by quilting a piece of heatmat between some lining fabric. The divider was sewn in place between the front and back lining fabric. Then the whole lining assembly was dropped into the bag and topstitched together around the top edge.

An inkle band was backed with a strip of the denim to form the strap. A cushion, padded with more of the heat mat, was added for extra comfort.

Hopefully the owner will love the bag as much as I do. I really like the vertical stripes created by the quilting. I think they make it look very smart. Just right for the young woman about town. The Monet/Hubble fabric gives it a pop of colour and a playful edge. All in all I'm pleased with the design.

It was hard to let this one go, but I think I can improve on it. Having the zip pocket at the back is a nice safety feature if you use it to hold your purse and phone, but it might not be very comfortable with the charger stored in there. So maybe moving the charger pocket to the front, under the flap, or inside the bag would make for a more comfortable design.

What do you think?

Monday 17 September 2018

Doctor Who Keyring

What does any fan of the good Doctor need to complete their accessories?

Why, a Doctor Who wristlet.

The stripes are inspired by the costume of the newest Doctor Who - Jodie Whittaker.

The band is a plain (tabby) weave and made of 100% cotton, so nice and soft on the wrist, but also hard wearing. It would make a great keyring, or a wristlet strap for a bag, camera or phone. Just the thing for any fan of the good Doctor.

Please get in touch if you know anyone who would love to show their support for the good lady Doctor

Wednesday 12 September 2018

Geode inspired coasters

Do you ever look at something and think, "Oooh! That would be fab in fabric?" Well today I am feeling inspired by geology; by the colours and folds that can be seen in the rocks of our landscape. The lines and textures would surely make a great image, but unfortunately, I don't know (yet) how to translate that inspiration into something fabric. Maybe embroidery, maybe a woven picture. Perhaps appliqué. Maybe a print on demand fabric?. For now that project is still in the pondering phase.

While I think about how to turn rock folds into fabric the urge to do something "rocky" isn't going away. So I had a rummage in the scraps' bag and found some felt. Perfect! For a while now, it's been obvious there should be a coaster on the bedside table. The circle of slightly worn away paint either needs touching up, or covering up and we all know which would be more fun to do. With my mind on rocks, the obvious design element (well obvious to me) was a geode. Those pretty little caves of crystal wonder.

The science bit

A geode is a hollow rock that is roughly spherical, maybe egg shaped, that formed in sedimentary or volcanic rock. In volcanic rocks the shape is formed by a gas bubble. In sedimentary rocks it might be formed by a tree root, or an animal burrow that over time rots away, leaving a void in the rock.

Water carrying dissolved minerals seeps into the rock's void and some of the mineral is deposited. Over time crystals grow inside the little rock cave. They might be almost clear quartz or calcite. Often the minerals interact with the quartz or calcite and produce vivid colours: blues, purples, yellows. The beautiful purples of amethyst crystals occur when quartz interacts with iron.

This page has more information about geode formation and there are also some cool videos on YouTube

Sometimes the entire geode is filled with crystals. When that happens slices through the geode show rings of crystal formation. It was an agate slice that inspired today's make.

Back to the crafting

My first attempt at a geode coaster was OK. Using a variable length zigzag stitch and a few different coloured threads to create circles of crystals, it didn't take long to create a rather psychedelic looking geode. Pelmet stiffener was sandwiched between two felt layers to stiffen the coaster and it was finished off a circle of clear vinyl stitched in place over the top.

It was OK, but I was sure there was a better solution than a loose piece of vinyl. I briefly considered gluing the vinyl in place, but then decided that someone else must have had the same problem and switched on the computer.

Eureka!

Fusible vinyl. Why am I only just learning about this?

For my second attempt I used a grey background, to represent the clear crystals of the geode. Black felt for the back and black edge stitching gave a more rock-like colour scheme for the "outside" of the geode. Then it was the moment of truth. Armed with my new favourite craft supply and a medium hot iron I held my breath, hoping I wasn't going to end up with glue and melted vinyl stuck to the iron.

I am so pleased with this second attempt. It has the stiffness of a "proper" coaster and the waterproof coating sits snuggly over the embroidery. I think I will be making more of these for the winter fairs. If you were going to buy a set of four would you want all one colour scheme or a variety of colours to choose from? Add a comment and tell me what you'd prefer.

Friday 7 September 2018

Inkle Sheep

After all that hard thinking about shaft mapping and the like for my Krokbragd posts, I was really feeling the need for something a bit easier on the grey matter. And here it is:- card woven sheep.

Idly searching for who knows what I came across this blog post at Hilltop Cloud.

I knew I just had to weave some of those cute little creatures. So I did.

They are so adorable with their little black hooves and chubby little bodies. Weaving them was a joy as it is a simple four forwards, four backwards repeating pattern. The only twisting to worry about was at the edges for the border.

Setting up the loom was less of a joy.

Much as I enjoy tablet weaving, setting up the warp is a real pain in the backside. I've not yet managed to find a warping technique that didn't result in a couple of big knots and a length of whatever was to hand tying them together. As you can see, not pretty and hard to tension. Arghhhhhh! Oh and that's the improved version, after I added the carabiners.

Then, I received a new book. "Tablets at Work" by Claudia Wollny. It is awesome! Seven hundred or so pages of detailed instructions. A proper text book for card weavers. Claudia describes in detail a warping technique that I'd seen before and dismissed as looking a bit complicated. She makes it sound much easier. So in the near future, I'm going to give it a go and hopefully it will be "Bye, bye, big ugly knots holding my band together."

If you're interested in weaving some sheep, here is the card set up. I don't think I'm infringing anyone's copyright as I've seen the pattern all over the place since I saw it on Hilltop Cloud. But if you copy it, why not give Katie and Hilltop Cloud the credit.

Happy weaving.

Wednesday 5 September 2018

Krokbragd comparison (Krokbragd #3)

Latest update - check out Krokbragd #4 for images of the warping pattern with actual yarn.

It has been a head-scratching week here at KiniB. Trying to make sense of the various Krokbragd instructions across various books and websites. I think I've got my head around it but if anyone spots a mistake hopefully they'll let me know.

I have based my research on the warping pattern from Yarn in my Pocket. Back slot to front slot is shaft (weft thread colour) #1. Back slot to front hole is colour #2 and back hole to front slot is colour #3. There are twice as many #2 warp threads to create the repeat in pattern 1-2-3-2, 1-2-3-2...

Remember - in Krokbragd the warp is completely covered by the weft so it can be of any colour and would, I expect, normally be one colour. For clarity, so you can see which thread goes where, three colours are used in the diagram.

I chose the 2&3...1&3...1&2...1&3 (1... 2... 3... 2...) lift pattern as a baseline, because that seemed to produce the most consistent results when testing patterns. Putting that together with the warping shown gave me the lifting and shed sequence shown below. Note that while that looks like four separate movements there are only three movements involved. The 1&3 repeats are created in one pass of the weft.

Now lets add some weft colours. We'll use blue, red and green in that order.

Lifting both heddles (2 & 3) and passing the weft creates a pattern pixel of weft colour A (blue).

Lowering the front heddle (1 & 3) and passing the weft creates a pattern pixel of weft colour B (red).

Lowering the back heddle (1 & 2) and passing the weft creates a pattern pixel of weft colour C (green).

The next step was to map the instructions from other Krokbragd resources onto this pattern. The results are as shown below. The different order of lifts means that if we use the weft colours A (blue), B (red) and C (green) in the same order for each set of instructions, they will appear in different parts of the four pixel/warp wide pattern.

For example. Yarn in my Pocket starts the sequence with shafts 1 and 2 lifted, opening shed 3. So when we pass the blue weft it will appear in shaft position three of the pattern. Next in the sequence shed 1 is opened so the red weft will appear in the first position. Finally both heddles are raised to open shed 2 which gives two green threads. The resulting four column thread pattern is shown below each table.

If we apply this logic to a simple pattern it is easier to see the effect of these different mappings. In the top row we have, to the left, the original pattern using the sequence described by Ask the Bellwether. To the right is the same pattern using the shed sequence from Yarn in my Pocket.

In the second row are the patterns based on the sequences in "The Wheel" and in the booklet "Krokbragd and Boundweave: Three, Four and Five Shafts" (also known as "Blended Draft for Krokbragd" by David Xenakis).

It should be noted that in David's book he uses a different warping pattern, as shown below. Notice how the repeated thread corresponds to the Slot - Slot warps.

I don't know if anyone else will find this piece of research useful, but it has really helped me to think through how Krokbragd patterns are constructed and how one small change in lifting order can completely change the way the pattern appears when woven.

If you would like a copy of the spreadsheet, you can download it here

Do let me know if you've found it helpful.