Saturday, 17 April 2021

Return to Krokbragd (Krokbragd #4)

It felt like the time was right for more Krokbragd. I am toying with the idea of putting together a book, maybe more like a booklet, of patterns for rigid heddle weavers with double heddle blocks. Even if I'm the only person who reads it I think it will be a useful project and a great way of designing a Krokbragd sampler.

I find the idea using two heddles suits me much better than making string heddles or using pick up sticks for Krokbragd. Using two heddles make the process faster and really easy, and I keep my string heddles for inkle weaving.

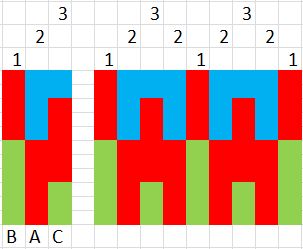
Obviously any design is only as good as it looks in the weft, not on paper (or screen) so task number one was warping up the loom ready for weaving. Task number two start designing. This post is about the warping process. Back in Krokbragd #3 I posted the above warping diagram for double heddles - back heddle at the top of the diagram, front heddle at the bottom.

I thought it might be useful to see what the warping diagram looks like in reality. To tie in with the diagram I used three different colours for the warp. Remember - the warp will be completely covered by the weft so the colours don't matter. I had a lack of suitable green yarn, so I've used white instead.

Notice how there are twice as many white (green) threads. They form the two instances of shed 2 colour in the 1 2 3 2, 1 2 3 2 weft pattern in a single weft pass. What that means is although it looks like there should be four actions per pattern row (1 2 3 2) each pattern is actually made up of three passes of weft colour not four.

With the different coloured warps it is easy to see the three separate sheds. With both heddles in the up position the "pixel" of weft colour will appear over the shed 1 warp. Red in the diagram.

When the front heddle is in the down position and the back heddle is in neutral then the "pixel" of warp colour will be in the repeated shed 2 positions. Notice how the white warp threads appear closer together - because there are twice as many of them.

Finally when the back heddle is down and the front heddle is in neutral the weft "pixels" will appear over the shed 3 warp. In all three pictures the back beam is on the right hand side of the image so the back heddle is what can be seen in the second and third images in the series of heddle position photos.

To complete the series of images the same colours of yarn were used to spread the warp - to show how the weft would build up into a pattern. You can see the 1 2 3 2, 1 2 3 2 repeats of the red white blue white red... The weft hasn't been beaten down as it would for actual Krokbragd but hopefully the images will help you to make more sense of the previous Krokbragd posts.

If you've found the images useful why not let me know with a comment.

Wednesday, 10 March 2021

I'm still here

It has been a while since I updated the blog. Crikey - nearly two years. So why post now? Well, a very dear friend pointed out that during these uncertain and scary times people don't always want to ring and check why you've "gone quiet" in case the news is bad. They pointed out that regular updates let people know I am still here (because despite its best efforts, not everyone is on Facebook). So here I am signing in to let you know lovely readers that I am still doing my thing.

I've been focussed more on back garden photography and writing than on painting or sewing over the last year and a bit, so to whet your appetite before a proper update here is an image I shot of the moon.

What we think of as the surface of the moon is actually regolith. Isn't that a wonderful word. It is the loose dust and broken rocks that cover the actual surface of the moon. It is mostly made up of the materials found in that area of the moon but also contains traces of material from distant impact crators.

When we look at the moon, even with our naked eyes, we see the dark areas - the maria - which are large areas of cooled basalt lava. Those areas tend to be higher in iron and magnesium. Some of those basalts are high in ilemite - an iron-titanium oxide. The areas of the moon that appear lighter are the lunar highlands. They are predominantly calcium rich rather than iron.

The colours of the photograph have been boosted to show the different colours of the moon's surface (or regolith) mineral content. The bluer areas are rich in ilmenite. So the blue areas reveal titanium rich deposits. The purple and orange areas contain less titanium. The white areas contain more calcium.

So there you go - a little art, a little geology. I hope you found it interesting. Please leave a comment if you enjoyed the read. And while you're at it why not pick up the phone, send an email, send a text, comment on a Facebook post, let people know you're still there, doing your thing.

Saturday, 2 February 2019

Log cabin #2

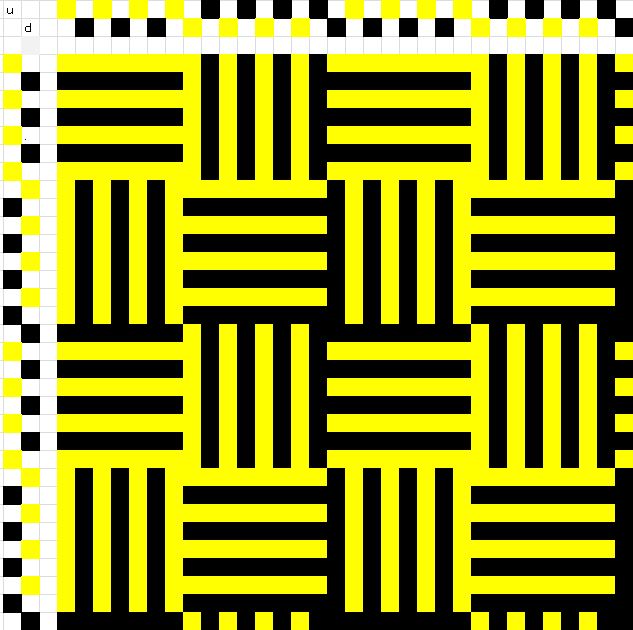
In my earlier post about weaving log cabin patterns I talked about how to warp up a standard 5A 5B pattern. That's the pattern many people start with, but you can vary the size of the blocks to create other effects. In this post I want to consider some of those variations.

With equal size blocks of colour (in this case 4 yellow and 4 black) in the warp and the same pattern in the weft each block starts on one colour and ends on the other.

If you start with blocks of 5A and 4B before continuing with 5A and 5B the colour change is the other way round. So if you look at the first group of vertical lines instead of going black to yellow they go yellow to black. Similarly the horizontal stripes originally had black at the top and yellow at the bottom, that two has been reversed.

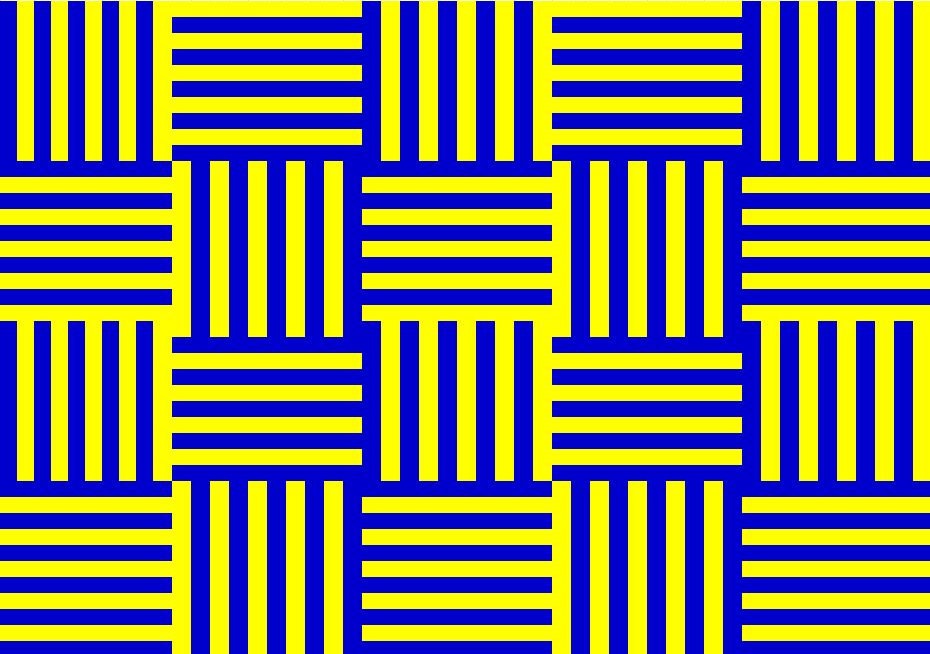
The pattern changes when the warp (or weft) has two adjacent threads of the same colour. By changing the position of those adjacent threads it is possible to generate many different log cabin patterns. For example:-

By always doubling one colour a symmetrical group is created. Using groups of different widths you can create more complex patterns.

What's your favourite log cabin pattern? Let me know with a comment.

Saturday, 12 January 2019

Yarn Count

Another of the questions I often see on weaving forums is "what do those numbers like 3/2 mean?" When a weaver comes from a background of knitting or crochet where you have names like "laceweight" or "double knitting" it can be confusing to suddenly see patterns asking you to use 8/2 cotton or 2/16 silk or whatever. So what do those numbers mean?

If you buy a rod of metal it is likely to be labelled with the diameter (side to side measurement). Metal doesn't compress when you press it between your fingers, so the diameter is constant unless the rod is processed in some way. Yarn on the other hand is squashy. If you press it between your fingers it compresses to a narrower diameter. So diameter is not the most useful measure for yarn. Instead yarn is gauged, or numbered, by "Yarn count" which can be either a measure of length per unit weight or weight per unit length. These are known as direct and indirect numbering systems. All yarn has a count. It may have a name, but it will have been spun to a particular count.

Yarn counts are complicated because in the past there were no national or international yarn standards so spinners made up their own count systems, so at best you might have a regional count system, but not a national one. There are still a range of count systems, but they can be split into two groups: direct and indirect counts.

Direct yarn numbering system (mass/unit length)

The unit length is fixed and the weight is measured. The measurements are in the form X grammes/Y metres (or in Imperial measurements, X pounds/Y yards).

The international standard measurement for yarn (ISO 1144:2016) is a direct numbering system, using metric measurements and is known as the Tex. The Tex can be used from fibre to yarn and is given in grammes/kilometre (grammes/1000m). It is used for both natural and synthetic fibres.

Under the direct numbering system the larger the number, the thicker the yarn (for a given fibre), because for the same length of yarn there is more weight, so it must be thicker.

For example Tex 30 means each length of 1,000 metres is 30 grammes of weight. For Tex 100, a length of 1,000 metres has 100 grammes of weight. Tex is a logical system. If the Tex number is doubled, the yarn is twice as thick.

Another common direct numbering system is the denier. The denier was based on a strand of silk. Nine hundred metres of single strand silk weighs about one gramme. Denier is often associated with the sheerness of tights or stockings, perhaps because these were made from silk prior to developments in synthetic fibres.

Indirect yarn numbering system (length/unit mass)

The unit weight is fixed and the length is measured. The measurements are in the form X metres/Kg (or in Imperial units, X yards/pound).

Under the indirect numbering system the larger the number, the thinner the yarn (for a given fibre), because for the same weight of yarn there is more length, so it must be thinner (like rolling out a sausage of plasticine).

Common indirect count systems are shown in the table.

English Cotton Count (Ne) is a commonly used system. The yarn count number indicates the “number of 840 yard hanks of yarn per 1 pound weight”.

For example, Ne 1 – In one pound of yarn weight, there are 840 yards of yarn. Ne 5 – In one pound of yarn weight, there are 4200 (840x5) yards of yarn.

What's that? Your yarn is plied? Oh my. How does that fit with the count systems?

Strand number

It was very tempting to use the word "ply" as a title for this section, but "ply" comes with its own confusion - like 4 ply yarn that isn't made up of four strands. What's that all about? Maybe I'll get back to that...

A full count system has two numbers: the count number itself and the number of strands that are twisted together to form the yarn. So, strictly speaking a "single" would have a 1 as part of its description, to indicate one strand of yarn.

Cotton count (Ne) and metric (Nm) count tend to have the count number first, so 30/1 cotton (1 means single yarn) indicates that 30 x 840 yards of single strand yarn weigh 1 pound.

But what about something labelled 40/2? Taking the count number first. There are forty lots of 840 yards per pound of yarn so if this were single strand there would be 33600 yards of yarn. But, this is a 2 strand/ply yarn, so two strands are twisted together, making the yarn fatter. If the yarn is fatter it must be shorter (for the same weight) so the resultant count is 40/2 = 20. That means there would be 20 x 840 = 16800 yards of yarn in 1 pound weight.

For inkle weaving I like to use mercerised (aka perle) cotton. Common sizes for that are 3/2, 5/2 and 8/2. The 8/2 is the finest (a resultant count of 4), so 4 x 840 = 3,360 yards/pound. 3/2 (a resultant count of 1.5) so 1.5 x 840 = 1,260 yards/pound. Shorter length = fatter yarn.

Other systems have the numbers the other way around, so 2/30 would be 2 strands of 30 count yarn plyed together weighs one pound, which gives an overall count of 15.

Direct count systems, such as Tex or Denier, tend to have a single number, such as 60 denier of 40 Tex.

This page has a useful description of the many, many yarn counts.

This page contains a link to a chart containing many yarns used for weaving. It contains both the yards/pound and metres/kg data for a range of yarn types ans sizes. You can use the information to help find an equivalent yarn for a project. Maybe I'll write a blog about how to use the data another time.

As I said at the beginning, yarn count is a complicated business. I've barely scratched the surface here. I haven't really answered the question of how to compare knitting/crochet yarn with these count systems so perhaps that will be a toic for another time.

Note:

As a good scientist, I should point out that where I've used the word "weight" I am referring to the colloquial term, used when we "weigh" ourselves, some apples, our yarn, etc. For accuracy, I should of course have used the word "mass" but I figured that would add an extra layer of complication for those who maybe didn't have a science teacher who hammered home the difference.

Sunday, 25 November 2018

Yule Log Cabin

A question recently came up on a weaving forum. How do you warp for log cabin patterns? I stared at the screen for a moment and then thought "Same as I always do."

But then I cast my mind back to my first attempt at a log cabin pattern. It seemed to be so complicated and needing way more effort than I thought it should. I could NOT get my head around how to warp it. I looked at books. I looked at videos. Many of the methods involved tying individual warps or creating a direct warp loop then cutting it and tying it to the back beam. Not a simple continuous warp. That was the goal.

In the end, by drawing pictures of the warp loops in the heddle and how they'd split into the pattern, a continuous warp was achieved.

My first attempt was not great. There was not enough contrast between the yarn colours, but it was clear from looking at more successful colour pairings the optical illusion of a log cabin pattern was a goal worth pursuing. But how to get over the tedium of warping it? There had to be a way to simplify the warping: one that avoided lots of cutting and tying, or having to colour in pictures on squared paper.

I applied the Feynman algorithm and thought hard about the problem. How to tie on a log cabin without too much effort? Aided by the magic of Photoshop layers, I mocked up the warp and here is the result. My (slightly) lazy version of a log cabin warp.

A basic log cabin contains two pattern blocks. Both blocks start on one colour and end on another. In each block there are equal numbers of warp threads for each colour.

As you change from one block to the next there are two warps of the same colour. So moving from block 1 to block 2, there are two yellow warps together. Moving from block 2 back to block 1, there are two blue warps together. So how can that pattern be created using a direct warp and without lots and lots of knot tying?

It helps to think of the two blocks as a block of six and a block of four, instead of two blocks of five. So for block one warp three loops of blue in the slots as normal, but skipping every other slot. Next warp three loops of yellow in the holes to the right of the "blue" slots. That's block one complete. Notice how there are an empty slot and hole between each pair of colours and that there are six loops warped up.

For block two, skip a slot and a hole as before. In the next slot, start with yellow, skip a slot and warp the next one. Then add the blue into the holes next to the yellow. This time you only need four warp loops. As before skip a slot and a hole and then repeat block one. Repeat the two blocks across the required width.

Once the warp is complete cut the loop at the warping peg and wind on to the back beam as normal. Then pull the warp threads into the correct holes as per the pattern.

Maybe I should try this out for blocks of different sizes and see if it works for those too. What do you think? Would that be useful? Leave a comment and let me know.

Friday, 7 September 2018

Inkle Sheep

After all that hard thinking about shaft mapping and the like for my Krokbragd posts, I was really feeling the need for something a bit easier on the grey matter. And here it is:- card woven sheep.

Idly searching for who knows what I came across this blog post at Hilltop Cloud.

I knew I just had to weave some of those cute little creatures. So I did.

They are so adorable with their little black hooves and chubby little bodies. Weaving them was a joy as it is a simple four forwards, four backwards repeating pattern. The only twisting to worry about was at the edges for the border.

Setting up the loom was less of a joy.

Much as I enjoy tablet weaving, setting up the warp is a real pain in the backside. I've not yet managed to find a warping technique that didn't result in a couple of big knots and a length of whatever was to hand tying them together. As you can see, not pretty and hard to tension. Arghhhhhh! Oh and that's the improved version, after I added the carabiners.

Then, I received a new book. "Tablets at Work" by Claudia Wollny. It is awesome! Seven hundred or so pages of detailed instructions. A proper text book for card weavers. Claudia describes in detail a warping technique that I'd seen before and dismissed as looking a bit complicated. She makes it sound much easier. So in the near future, I'm going to give it a go and hopefully it will be "Bye, bye, big ugly knots holding my band together."

If you're interested in weaving some sheep, here is the card set up. I don't think I'm infringing anyone's copyright as I've seen the pattern all over the place since I saw it on Hilltop Cloud. But if you copy it, why not give Katie and Hilltop Cloud the credit.

Happy weaving.

Wednesday, 5 September 2018

Krokbragd comparison (Krokbragd #3)

Latest update - check out Krokbragd #4 for images of the warping pattern with actual yarn.

It has been a head-scratching week here at KiniB. Trying to make sense of the various Krokbragd instructions across various books and websites. I think I've got my head around it but if anyone spots a mistake hopefully they'll let me know.

I have based my research on the warping pattern from Yarn in my Pocket. Back slot to front slot is shaft (weft thread colour) #1. Back slot to front hole is colour #2 and back hole to front slot is colour #3. There are twice as many #2 warp threads to create the repeat in pattern 1-2-3-2, 1-2-3-2...

Remember - in Krokbragd the warp is completely covered by the weft so it can be of any colour and would, I expect, normally be one colour. For clarity, so you can see which thread goes where, three colours are used in the diagram.

I chose the 2&3...1&3...1&2...1&3 (1... 2... 3... 2...) lift pattern as a baseline, because that seemed to produce the most consistent results when testing patterns. Putting that together with the warping shown gave me the lifting and shed sequence shown below. Note that while that looks like four separate movements there are only three movements involved. The 1&3 repeats are created in one pass of the weft.

Now lets add some weft colours. We'll use blue, red and green in that order.

Lifting both heddles (2 & 3) and passing the weft creates a pattern pixel of weft colour A (blue).

Lowering the front heddle (1 & 3) and passing the weft creates a pattern pixel of weft colour B (red).

Lowering the back heddle (1 & 2) and passing the weft creates a pattern pixel of weft colour C (green).

The next step was to map the instructions from other Krokbragd resources onto this pattern. The results are as shown below. The different order of lifts means that if we use the weft colours A (blue), B (red) and C (green) in the same order for each set of instructions, they will appear in different parts of the four pixel/warp wide pattern.

For example. Yarn in my Pocket starts the sequence with shafts 1 and 2 lifted, opening shed 3. So when we pass the blue weft it will appear in shaft position three of the pattern. Next in the sequence shed 1 is opened so the red weft will appear in the first position. Finally both heddles are raised to open shed 2 which gives two green threads. The resulting four column thread pattern is shown below each table.

If we apply this logic to a simple pattern it is easier to see the effect of these different mappings. In the top row we have, to the left, the original pattern using the sequence described by Ask the Bellwether. To the right is the same pattern using the shed sequence from Yarn in my Pocket.

In the second row are the patterns based on the sequences in "The Wheel" and in the booklet "Krokbragd and Boundweave: Three, Four and Five Shafts" (also known as "Blended Draft for Krokbragd" by David Xenakis).

It should be noted that in David's book he uses a different warping pattern, as shown below. Notice how the repeated thread corresponds to the Slot - Slot warps.

I don't know if anyone else will find this piece of research useful, but it has really helped me to think through how Krokbragd patterns are constructed and how one small change in lifting order can completely change the way the pattern appears when woven.

If you would like a copy of the spreadsheet, you can download it here

Do let me know if you've found it helpful.